
Tuesday, 12 August 2014
Sunday, 13 July 2014
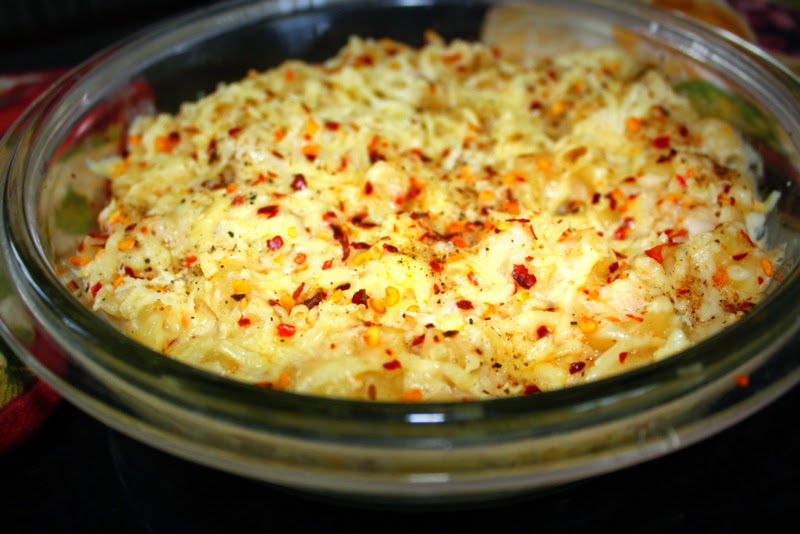
Macaroni in Béchamel sauce
Macaroni/Pasta is a most welcoming dish at my home and i generally make it for weeknight dinners. Also this dish screams of comfort!! I have not met anyone who does not like it. Just like there are no defined rules and lines for comfort, there is no hard and fast rule for how people make their Mac n Cheese. Make the classic macaroni with just cheese or spice it up with tomato sauce and some veggies you love.
Béchamel sauce is my most favorite sauce of all times. Its versatile and is used as the base for other sauces. Pair it with vegetables or turn it into a creamy casserole or ladle it over grilled chicken, it tastes yumm.
Get into the kitchen now and bake some yumm mac and cheese and feel good, really good :)
Ingredients
Macaroni- 1 cup
Oil- 1/2 tsp
Salt - 1 tsp
Butter - 2 tsp
All purpose flour(maida) 2 tsp
Milk - 1 1/2 cup (boiled and cooled)
Cheese - 1/2 cup (use mozzarella/amul cheese cubes)
Salt and pepper powder to taste
Oregano/mixed herbs (Optional)
Chilli flakes (optional)
Method:-
In a wide pan, bring water to boil with some salt and oil and add the pasta and cook till the macaroni is al dente.( Not too soft or too firm) Stir slowly in between to prevent the pasta from sticking together. After it is cooked, drain it in a colander and drizzle some oil and keep it aside.
In a non stick pan melt butter, simmer and add maida stirring continuously. Saute till it changes color slightly. Then add 1/2 cup of milk and stir continuously with a whisk to prevent formation of lumps.
When it starts thickening, add the remaining milk gradually stirring continuously with the whisk.

Add some cheese, salt, pepper, chilli flakes and herbs to taste.Cook for another few minutes, till it thickens slightly and remove from flame. If it is too thick, add the water reserved while cooking pasta and heat again.

Turn off the flame and add the macaroni in the sauce and mix it evenly.

Meanwhile preheat the oven for 180 degree C
Transfer macaroni is a glass bowl and layer cheese all over the macaroni and bake it for about 10 minutes. If you do not have an oven, top macaroni with grated cheese and leave it to simmer for 5 minutes and serve hot.

Saturday, 28 June 2014
Choco-Vanilla marble cake

Marble cake is a classic teatime treat, its easy to prepare and also wonderful to look at!! Two cake batters are poured alternatively in the middle of the cake pan and it is then blended slightly with a knife or tooth pick to create a marble pattern. This creates a striped pattern similar to the Zebra.
The choco and vanilla layers fascinated me from childhood days. You can add different flavors to the same recipe. I once made an orangle chocolate marble cake and that was yumm too. Its like a double treat, you can enjoy both the flavors in a single bite. This recipe is also very easy to put together and can be prepared anytime as a quick evening snack or even for an elaborate special occasion.
Baking a cake may look like a tedious job, but trust me it just needs little patience and correct measurements, also the lovely smell it leaves in your kitchen for days makes all the effort totally worth it :)
Ingredients:-
Maida- 2 cups
Sugar- 1 cup
Vegetable Oil- 1 cup
Milk- 1 cup
Eggs - 4
Vanilla Essence- 1 tsp
Baking Powder- 3 tsp
Cocoa Powder- 3 tsp
Baking soda- Pinch
Handful of Choco chips (Optional)
Method:-
Begin by pre-heating the oven to 180 C.
Sift together maida, baking soda and baking powder in a bowl.
Take the eggs in a large mixing bowl and beat it nicely. Add the sugar, oil, vanilla extract and milk to this and whisk again to make a fluffy batter.
Slowly add maida into the wet mixture while mixing continuously using the cut and fold method until you get a smooth batter.
Divide the batter into two bowls. In one portion add the cocoa powder and mix thoroughly. In the other portion you can add choco chips for more flavour (Toss them in maida before adding them to the batter) This is optional, I like having some crunch in cakes.
In a medium baking dish or a loaf pan grease the base with butter and dust with flour.

Now take about 1/4 cup of the vanilla batter and pour in the center of the cake pan, next pour the same amount (about 1/4 cup) of the brown chocolate batter on top of the vanilla batter and in the center of the pan. Repeat the process alternating the batter. The batter will spread creating the zebra print.
Using a knife or toothpick, swirl the batter to create a marbling effect.
Place the cake pan into the preheated oven and bake for 30 to 45 minutes until the tester when inserted into the cake comes out clean.
Once the cake is baked, remove from the oven and allow it to cool for at least 5 minutes before you an invert, cut and serve.

Serve the delicious cake along with breakfast or as a tea time snack with a cup of coffee!!
*While creating the marbling effect on the cake ensure that it isn’t done too much, or else the chocolate flavor will dominate the cake.
Saturday, 21 June 2014
Chilli Garlic Hakka Noodles

If you love the aroma of fried garlic and the burnt veggies you are going to love this recipe!
Hakka Noodles are quickly stir fried with a spicy Indian Chinese flavored sauce and crunchy vegetables. You can add lot of variations to this recipe and make your own favorite.
Chinese being a favorite kind of cuisine in our home, we cook a lot of noodles, fried rice and manchurian. This recipe is quick and insanely good :)
Ingredients:-
Plain noodles 1 & 1/2 cup
Spring Onion/Carrots/Capsicum/Cabbage- a handful finely chopped
Chilli flakes- 2 tsp
Garlic- 5 to 6
Pepper 1/2 tsp
Tomato chilli sauce- 2 tsp
Soya Sauce - 2 tsp Vinegar - 1 tsp or to taste
Salt as per taste
Olive Oil- 3 tsp
Method:-
Boil water in a sauce pan, add some salt. Cook noodles al'dente (as per package directions). Drain the water and drizzle some oil and set aside.
Heat a pan with oil and fry chopped garlic and add the veggies one by one frying each for half minute. Add the sauces, salt and pepper and give a quick stir.

If you have a big pan try tossing the veggies in such a way that it catches fire. This gives the noodles that burnt and smoky flavor.
Add the chilli flakes and the noodles and mix them well with the veggies. Fry them on high flame all the time. Cook for about 10 minutes and turn of the flame.

Serve hot with any Manchurian or as such with sauce.
Saturday, 24 May 2014
Punugulu
(Crispy fritters with left over idli/dosa batter)

Punugulu are a deep fried fritters made from left over Idli/Dosa batter. Its a very popular street food in Andhra. Great way to use up the left over batter.
The key to make tasty punugulu is making them less oily, yet crispy. This can be done by making the batter in the right consistency. Not too thick and not too thin. Thick batter makes your fritters hard, while the thin runny batter, makes them oily and soggy too.
This is the most basic version, they can be made with lot of variations. I made them with dosa batter. Quick and easy snack to make and they are perfect accompaniment with chai/coffee on a breezy evening :)
Ingredients-
Dosa Batter - 2 cups
Rice flour -2 tsp
Semolina(Suji Rava) - 2 tsp
Onions finely chopped- 1
Green chilies finely chopped- 2
Cumin seeds- 1/2 tsp
Curry leaves- 1 sprig
Coriander leaves- 2 tsp
Ginger (Optional)
Pinch of hing(Optional)
Salt to taste
Oil for deep frying
Method:-
Take the dosa batter and add the rice flour, semolina, chopped onion, green chillies,cumin seeds, chopped ginger, salt and chopped coriander,curry leaves. Do not add any water.
If the batter is still runny add lil more rice flour to get correct consistency.
Mix everything nicely and let it rest for at least 30 minutes.
Heat oil in a kadai. Once its hot, drop small balls of batter into it. Reduce heat to medium and turn the fritters once they change colour.
Drain them onto paper towels. (Make sure not to overcrowd them)
Serve as-is or with any chutney.
Saturday, 17 May 2014
Cut Mango Pickle
(Cheat Version)

I love pickles and can totally survive on pickles if given a choice. Avakaya/mango pickle is one of my favorite pickle. I was never a fan of summers, only 2 things made me happy- school holidays and my moms mango pickle. My mom makes this amazing raw mango pickle in summers, we used to eat it for the whole year.
So, the one my mom makes is toughest pickle as she makes it with almost 200 raw mangoes cut into big pieces. This year I attempted to make an easy pickle on my own and it turned out great.
I call this the cheat version because this is the quick and made with very few ingredients. Nothing complicated or high end.
Ingredients:-
Raw mangoes 2
Chilli powder 1/2 cup
Turmeric powder 1/2 tsp
Red chillies(Optional)
Generous pinch of Hing
Mustard seeds 1/4 cup
Methi seeds 2tsp
Sesame oil 1/2 cup
Salt 1/2 cup
Method:-
Wash and wipe the mangoes with a dry cloth and cut them into very small pieces along with the skin. Spread on a dry cloth to dry for half an hour to one hour.
Dry roast methi seeds and mustard seeds and red chillies in a pan and cool them completely and powder them in blender.

In a bowl mix red chili powder, mustard-methi powder, salt, turmeric, hing until everything is mixed well. Add mango pieces to it and coat them with the spice mix.


Add cooled sesame oil over the pickled mango pieces and mix well. Store the pickle in an air tight container and let it rest for a day.

Notes-
Be very careful to keep your hand dry while making the pickle. Try to use plastic spoon for mixing the powders. Moist can make the pickle not last very long.
Use the best chilli powder with great colour, its just makes the pickle look divine!
After a day, you can see that pickle releases oil. Then you check the taste and adjust salt.
You could store the pickle for a month in refrigerator, if used carefully.
Saturday, 26 April 2014
Onion Muruku

Murukulu are a traditional and classic snack that are crunchy and addictive with a cup of coffee or garam masala chai. This is a favorite savory snack in our home and I always look for occasions to make them.
So this time I tried to give the regular muruku a twist and added onions to get additional taste and flavour to this snack and they have turned out pretty well.
Its fun to make these deep fried savories at home with help of a family member, I always take my husbands help :) Also be extra careful around oil, keep the children away from the kitchen and wear short sleeves and cotton clothes only while deep frying anything.
Ingredients
Rice flour - 2 cups
Roasted chana dal powder - 1/2 cup (Putnala Pappu)
Ghee/Butter - 25 gm.
Chilli powder - 1 +1/2 tsp.
Chopped onion - 1/2 cup.
Ajwain/Carom seeds 1/2 tsp
White sesame seeds 1/2 tsp (Optional)
Salt as per taste
Oil for deep frying
Method:-
Grind 1/2 cup chopped onions into a fine paste in a blender.
In a bowl mix rice flour, roasted chana dal powder, chilli powder, ghee, salt and ground onion paste. Now slowly add water little by little and make stiff dough. The dough should be just soft enough to pass through the muruku presser.
Muruku Presser is easily available and any super market or condiments shops.(Following is the image of the same)

Mean while, heat the oil. To check whether oil is hot, put a small piece of dough into an oil, when it pops out immediately,it is an indication that oil is hot.
Take muruku press, with a star shape plate. Fill it half with dough we prepared and press it in a circular motion. When the muruku starts to change color, flip again using a slotted ladle and fry till light golden. Make sure to cook evenly. Drain on kitchen tissue and leave it to cool.
Repeat the process until you finish off the dough. You can store them in an air tight container and enjoy!!
Saturday, 12 April 2014
Malabar Parotta
(Served with Spicy Daal Fry)

Kerala Parotta is a layered flat bread of south India, It is similar to north India’s Laccha Parotta. They are usually made in 2 ways, 1 very rich with egg and milk and 2 light variant without eggs and milk.
I crave for them pretty often. So,instead of buying them always from eateries, I decided to do some research on them and make at home. Also, I used both wheat and maida flours instead of only maida as they can be too heavy and not very healthy. Following is a vegetarian recipe for the same.
You can make them as you like and of-course only maida may have different flavor. So do not hesitate to explore and try this recipe. I served them with spicy daal fry Recipe and everyone loved it!!
Ingredients:-
Wheat flour- 1 cup
Maida- 1 cup
Oil/ Ghee 2tsp
Baking soda 1/4 tsp
Hot water to knead dough
Salt as per taste
Butter for garnishing
Method:-
Sieve both the wheat flour, maida with baking soda and keep aside. Add salt, hot water and knead the dough till soft, smooth and elastic with help of some oil.
Cover with a moist cloth and keep aside for 45 minutes to 1 hour to rest.
Now divide them into round balls, dust the working surface with flour and roll each ball as thinly as possible into a large roti. Apply oil/ghee on the entire surface of the rolled dough.

Hold the roti from the top on both sides and pleat them till bottom. Once its pleated hold one end of the long strip and roll it towards the other end to create a spiralled balls and tuck the end under.


Prepare with the rest of other thick rotis and keep them greased at all times. Cover with wet cloth and keep aside for 15 minutes.
Take each rolled ball on a dusted working surface, roll it softly without applying pressure. Make sure to roll only on one side
Heat the pan and place the Parotta on the tava and fry on both sides with oil/ghee drizzled on top and the edges till the Parottas are crisp and golden.

Once done, use both hands and pat
on the sides of the kerala Parotta to get the layers. Butter and serve them with any spicy curry or dal fry!!
Saturday, 5 April 2014
Masala Dosa
(With fiery red garlic spread)

Masala dosa is one of my favorite food. Almost every time I am in a south indian restaurant I order masala dosa! So today I am sharing recipe for a crisp dosa lathered with a fiery red chutney and stuffed with some mashed aloo filling.
Though making masala dosa is a long process, trust me its totally worth it. These dosas are incomplete without the spicy garlic spread on top, so I take extra efforts to make best spread and I like my aloo masala filling to be as lump free as possible, so the trick here is be patient and let aloo cook perfectly!
Ingredients for Spread/Chutney
Garlic - 2 whole pods
Urad Dal - 2 tsp
Red Chili -5
Oil - 1 tsp
Salt to tasteIngredients for Aloo masala
Onions 3
Aloo 2
Red Chillies 3
Green chillies 2
Finely chopped ginger 1 tsp
Turmeric powder 1 tsp
Curry leaves few
Cumin seeds 1/2tsp
Mustard seeds 1/2tsp
Salt to taste
Oil 2 tsp
Butter for garnishing
Method:-
For garlic spread, dry roast all the ingredients mentioned above without adding any oil. Now add them in a blender and add salt and blend to a smooth paste. If the mixer you use is not small enough to blend this to a smooth paste, you can add little water to it.
Wash and pressure cook aloo with 1/2 cup water for 3 whistles. Peel off the skin and mash it well.
Heat a pan with oil and temper with cumin seeds,mustard seeds, curry leaves and red chillies. Now add ginger, green chillies and saute for a minute. Add onions and cook them until they turn soft. Add the mashed potatoes, salt and mix well. Fry for 5 minutes, add oil if needed more.
Take a non stick pan and when it gets hot put a ladle full of batter and spread it evenly on the pan. Use your spatula and flatten the top of the dosa to make it uniformly thick as possible to ensure even cooking.

Now spread the garlic masala on top of the dosa and drizzle oil generously on top. Add 2 spoonfuls of the potato masala and dollop of butter and fold one edge of the dosa over the other when the first side has browned reasonably well.

Serve them with coconut chutney and enjoy!

Saturday, 29 March 2014
Recipe Credits- Omi Swati
Malpua
(Pancakes Desi style)

Malpua is a traditional sweet of north India, its basically a pancake covered all over with the sugar syrup. You can decorate it with dry fruits to make it look more appealing. It is also the morning food which is served to lord Jagannath in his temple. Here is the wonderful Malpua recipe for you to use by my friend Omi. She is from Ranchi and a big time foodie like me!! She promised to share more authentic dishes from her native place for all of us :)
Ingredients:
For 4 people
Maida 2 cups
Skimmed milk 1/2 cup
Bananas 2
Chopped almonds, cashew, raisins 2tsp
Sunflower or vegetable oil 2 cups
Fennel seeds 5 tsp
Grated dried coconut 1 cup
Sugar 1 cup or as desired
Method:-
Mix flour, dried Coconut, bananas, saunf, chopped dry fruits in a bowl. Add enough milk to make this into a paste. Heat a non-stick tawa (flat griddle) and put 2-3 tbsp. oil in it and spread it with wooden spatula. Take a small katori full of paste and spread it in round fashion in the heated tawa. Make 2-3 rounds of paste depending upon how big your pan is.
Cook it in the slow heat for some time and then turn all puas to other side using a thin flat spatula. When you feel its done (10-12 minutes) put it in an absorbent paper for a while (so that the oil can be absorbed). Alternately, you can also deep fry the paste in a pan in making round shapes, but I prefer the non stick tawa way as it is remarkably less oily.
Soon after you take the pua from the tawa, you dip it in the chashni or rabdi! These can be eaten both hot and cold.
Prepare chashni as below:
Sugar - 2 cups, water - 2 cups. Put sugar in boiling water and stir it until a thick consistent solution is attained.
Ta da...delicious malpuas are ready to serve and I feel they are too special to confine them to festival special dish only, after you've tried them you'll probably want them all the time!!
Friday, 21 March 2014
Vanilla & Choco Chip Sponge Cake
(Eggless)

Like everyone I am also a big fan of cakes. To be honest it took me couple of times to make perfect cake and I think the trick here is stick to ingredients measurements, don't play around them and follow the instructions to the T!!
This recipe is quite simple with no butter or any other fancy substitutes and is a simple and easy to make and not fussy at all! Secret ingredient of this cake is curd, it would be tough to believe that one hasn’t used eggs in it but believe me that cake is absolutely soft and fluffy.
I was too busy eating the cake and couldn't take pics after cutting them into slices, next time I bake this cake I will surely add more pics here :)
Ingredients
Maida- 1 and 1/2 cup
Curd- 1 cup
Powdered Sugar - 3/4 cup
Baking soda - 1/2 tsp
Baking powder - 1 and 1/4 tsp
Oil - 1/2 cup
Vanilla essence - 1 and 1/2 tsp
Choco Chips- 1/2 cup
Chocolate/ Caramel sauce (Optional)
Method:-
Preheat the oven at 200 deg C(400 deg F) for 10 mins.
Sieve maida with help of strainer to remove any lumps and keep aside.
Now in a bowl, add curd and sugar and beat well with untill the sugar is dissolved completely. Once small bubbles start to appear add vanilla essence and oil and mix well.


Grease a cake tin or loaf pan, drizzle some flour and pour the batter to the tin and bake it for 30-35 mins or till a fork inserted into the center of the cake comes out clean.

Garnish with some chocolate sauce if you wish. I would suggest to cut into slices allowing it cool down completely leaving at least couple of hours to get firm neat slices.
Serve it with tea/coffee or eat as it is as a snack and enjoy!!
Pressure cooker cake:
In a pressure cooker add water and boil for a minute. Place a stand and a pour batter in a tin and pressure cook without whistle in high heat for first 10 mins then lower the heat to sim and cook for 30 mins or until a tooth pick inserted comes out clean.
After 30 mins switch off and leave the cake in the cooker for 5 more mins then open.Carefully remove the cake pan from the cooker and place it on a wet cloth for 5 mins. After 10 minute run the knife around the edges of cake tin.Then invert the cake pan to remove the cake.
Saturday, 8 March 2014
Masala vada

Masala vadas are a healthy twist to the regular vadas we make. This is my moms recipe and I make them for any special occasions and festivals. You can serve them with some tea or even as a side snack item with sambar or rasam. I remember falling in love with these vadas in tirupati, as they are street food there. I used to trouble mom to make them as big as they make. Do try them, they are simple and easy to make!
Ingredients
Channa dal 1 cup
Rice flour 1 tsp
Onion 1
Green chillies 5
Fennel 1 tsp
Coriander leaves chopped 1tsp
Mint leaves,chopped 1tsp
Curry leaves 1 sprig
Ginger 1 inch piece
Garlic 5 to 6 cloves
Oil for frying
Method
Soak channa dal for 3-4 hours, drain them and keep aside. Now grind ginger, garlic, chillies, curry leaves, mint leaves, coriander leaves and fennel coarsely.

Now add dal in two batches and grind coarsely. Do not add water.Mix finely chopped onion, salt, rice flour in the dal.


Wet your hands with water and make equal sized balls first for uniform sized vadas. Meanwhile heat oil in kadai. Shape each ball to flat patties and deep fry in hot oil until golden in colour,flipping once in between. Always cook in medium flame to ensure even cooking and golden colour.

Serve them with tea or coffee and enjoy!
Saturday, 1 March 2014
Recipe Credits- Baisakhi Saha

I am back with guest blog for February!! My dear friend, newly married bride has shared her home made cheese cake recipe with us. This crowd pleasing summer treat will have your family and friends swoon in delight. It is one of those desserts which is quite simple to make but looks as if you have toiled for hours. I also feel this is the best way to welcome sunny summer!!
I am big fan of cheese cakes and always end up going to these fancy places and pay lot of bucks to enjoy a slice of cake. Surprisingly we can make a decent cheese cake at home with all Indian ingredients as well. Thanks again baisakhi for taking time and clicking these beautiful pics and sharing this yumm recipe for all of us!
Ingredients
Amul cheese- 1 cup
Digestive biscuits 5-6
Set curd- 1/2 cup
Amul cream- 1 Packet
Gelatine or lemon grass- 1 tsp
(Suggestion- use only vegetarian gelatine. Please check the ingredients before buying and avoid the ones with animal extract)
Castor sugar 1/2 cup
Vanilla essence 1 tsp
Britania sponge cake 1
Butter 3 tsp

Method:
Grind the biscuits and mix the melted butter with it. Line the base of the serving dish evenly and smoothly with the biscuit mixture. Spread and press well with hand. Put in the freezer for 20 min or so to set.

 Now in a blender add curd, cream,vanilla essence, castor sugar and melted gelatine and whip it nicely.
 Remove the set crust from the freezer and pour this mixture onto the set biscuit base and add some more crushed cake for texture on top.
 Cover and put in the fridge to set for few hours. Garnish with sliced strawberries or blueberries and serve cold!!

Home made Indian Cheese Cake
Guest Blog by Baisakhi
I am back with guest blog for February!! My dear friend, newly married bride has shared her home made cheese cake recipe with us. This crowd pleasing summer treat will have your family and friends swoon in delight. It is one of those desserts which is quite simple to make but looks as if you have toiled for hours. I also feel this is the best way to welcome sunny summer!!
I am big fan of cheese cakes and always end up going to these fancy places and pay lot of bucks to enjoy a slice of cake. Surprisingly we can make a decent cheese cake at home with all Indian ingredients as well. Thanks again baisakhi for taking time and clicking these beautiful pics and sharing this yumm recipe for all of us!
Ingredients
Amul cheese- 1 cup
Digestive biscuits 5-6
Set curd- 1/2 cup
Amul cream- 1 Packet
Gelatine or lemon grass- 1 tsp
(Suggestion- use only vegetarian gelatine. Please check the ingredients before buying and avoid the ones with animal extract)
Castor sugar 1/2 cup
Vanilla essence 1 tsp
Britania sponge cake 1
Butter 3 tsp
Method:
Grind the biscuits and mix the melted butter with it. Line the base of the serving dish evenly and smoothly with the biscuit mixture. Spread and press well with hand. Put in the freezer for 20 min or so to set.
Saturday, 22 February 2014
Classic French Toast

French Toast is an easy breakfast option, perfect for Sunday mornings. Its a great comfort food and doesn't take more than 10 minutes to make! I know some people like to eat their toast as a savoury, but I prefer this one with sugar. I use brown bread most of the time at home, you may actually use any bread of your choice. There are lot of variations to this toast, so get in the kitchen and start making these easy and quick french toasts!
Ingredients
Eggs- 3
Brown bread- 4 slices
Milk- 180 ml
Vanilla extract- 1 tsp
Cinamon powder- 1/2 tsp (Optional)
Sugar 1 1/2 tsp
Salt- pinch
Butter
Method:
In a shallow bowl, beat eggs; add milk, sugar, vanilla extract, cinnamon powder and pinch of salt and make a smooth consistent batter without any lumps.


Soak bread for 30 seconds on each side in the custard.


Subscribe to:
Comments (Atom)